Usb fdd
Author: a | 2025-04-24

2) Plug your USB FDD into the USB port of your Macintosh. When you insert a formatted floppy diskette into the USB FDD, a removable disk icon will appear on the Macintosh desktop. The diskette can now be accessed. 2.2.2.2. Operating Operating Operating ConnectingConnectingConnecting the USB FDD the USB FDD the USB FDD

fdd to usb - Newegg.com
Read as shown. For instructions to initialize the floppy disk, see page 13. Mac OS X 9.x To install the USB FDD drivers: 1 Start the computer, then connect the USB cable to the USB port on the computer. Page 11: Using The Product Using the product Using the product Using the USB FDD with Windows USB Hub If using a USB Hub to power the USB FDD, be sure to use a self-powered hub that utilizes an AC power adapter. Do not use bus-powered hubs, such as USB hub dongles or the USB ports built into keyboards. Page 12 Using the product Note: Unlike a general disk drive, the USB FDD is not always assigned the “Drive A” designation. The drive letter assigned depends on your computer’s configuration. Disconnecting the USB FDD using Windows XP: 1 Left-click the USB icon in the system tray. A message displays to safely remove the floppy drive. Page 13 Using the product Disconnecting the USB FDD using Windows 98 or Windows 98 SE: 1 Make sure the green LED indicator is not on and data is not being read or written to the USB FDD. 2 Unplug the USB FDD cable from the computer. Using the USB FDD with Macintosh USB Hub If using a USB Hub to power the USB FDD, be sure to use a self-powered hub that... Page 14 Using the product To initialize the disk for Mac OS X 10.1.5 and Mac OS X 10.2.8: 1 in Mac OS
Macally (FDD-USB) (FDD-USB) External Floppy Drive for sale
Computers that have a working USB port •... Page 6: Setting Up The Product For Windows Setting up the product for Windows Windows 2000 To install the USB FDD drivers in Windows 2000: 1 Connect the USB cable to the USB port on the computer. 2 Turn on your computer. After Windows 2000 automatically installs the drivers, a Found New Hardware message appears next to the clock on the Windows taskbar. Page 7 Setting up the product for Windows 3 The USB FDD Driver Setup screen displays. Click Next to begin installation of the driver files. 4 Click Finish. 5 When you are prompted to restart your computer, click Yes. Your computer restarts and the driver installation is complete. Page 8 Setting up the product for Windows 6 After restarting the computer, connect the USB cable to the USB port on the computer. Windows 98 or Windows 98 SE automatically detects the USB FDD and adds the drive to the computer drive configuration. Note: Unlike a general disk drive, the USB FDD is not always assigned the “Drive A”... Page 9: Setting Up The Product For Macintosh Setting up the product for Macintosh Setting up the product for Macintosh Macintosh system requirements To use the USB FDD correctly, make sure that your system can at least support the following requirements: For Macintosh: • 32 MB RAM • 1 MB available hard drive space •... Page 10 Setting up the product for Macintosh In Mac OS X 10.2.8, the message mayBIOS USB-HDD,USB-FDD, ?
An IP67 rating, which means it can withstand water and dust. Galaxy A56 5G supports up to 6 generations of OS upgrades and up to 6 years of security updates. When you buy your smartphone on Samsung.com, you have easy access to authentic devices and Samsung services. You'll also stay informed about benefits and events happening on Samsung.com, while enjoying quick shipping and customer service, all handled by Samsung. Any issues or questions you have will be addressed directly by us, so you can have the best experience from purchase to servicing.22 Specifications Weight (g) 198 CPU Speed 2.9GHz, 2.6GHz, 1.9GHz CPU Speed 2.9GHz, 2.6GHz, 1.9GHz CPU Type Octa-Core Size (Main_Display) 170.1mm (6.7" full rectangle) / 165.5mm (6.5" rounded corners) Resolution (Main Display) 1080 x 2340 (FHD+) Technology (Main Display) Super AMOLED Color Depth (Main Display) 16M Max Refresh Rate (Main Display) 120 Hz Rear Camera - Resolution (Multiple) 50.0 MP + 12.0 MP + 5.0 MP Rear Camera - F Number (Multiple) F1.8 , F2.2 , F2.4 Rear Camera - Auto Focus Yes Rear Camera - OIS Yes Rear Camera Zoom Digital Zoom up to 10x Front Camera - Resolution 12.0 MP Front Camera - F Number F2.2 Front Camera - Auto Focus No Front Camera - OIS No Rear Camera - Flash Yes Front Camera - Flash No Video Recording Resolution UHD 4K (3840 x 2160)@30fps Slow Motion 240fps @HD Memory_(GB) 8 Storage (GB) 256 Available Storage (GB) 234.4 Number of SIM Dual-SIM SIM size Nano-SIM (4FF), Embedded-SIM SIM Slot Type SIM 1 + SIM 2 / SIM 1 + eSIM / Dual eSIM Infra 2G GSM, 3G WCDMA, 4G LTE FDD, 4G LTE TDD, 5G Sub6 FDD, 5G Sub6 TDD 2G GSM GSM850, GSM900, DCS1800, PCS1900 3G UMTS B1(2100), B2(1900), B4(AWS), B5(850), B8(900) 4G FDD LTE B1(2100), B2(1900), B3(1800), B4(AWS), B5(850), B7(2600), B8(900), B12(700), B17(700), B20(800), B25(1900), B26(850), B28(700), B32(1500), B66(AWS-3) 4G TDD LTE B38(2600), B40(2300), B41(2500) 5G FDD Sub6 N1(2100), N3(1800), N5(850), N7(2600), N8(900), N20(800), N28(700), N66(AWS-3) 5G TDD Sub6 N38(2600), N40(2300), N41(2500), N77(3700), N78(3500) USB Interface USB Type-C USB Version USB 2.0 Location Technology GPS, Glonass, Beidou, Galileo, QZSS Earjack USB Type-C MHL No Wi-Fi 802.11a/b/g/n/ac/ax 2.4GHz+5GHz, HE80, MIMO, 1024-QAM Wi-Fi Direct Yes Bluetooth Version Bluetooth v5.3 PC Sync. Smart Switch (PC version) Android Form Factor Touchscreen Bar Accelerometer, Fingerprint Sensor, Gyro Sensor, Geomagnetic Sensor, Light Sensor, Virtual Proximity Sensing Dimension (HxWxD, mm) 162.2 x 77.5 x 7.4 Weight (g) 198 Video Playback Time (Hours) Up to 29 Battery Capacity (mAh, Typical) 5000 Removable No Stereo Support Yes Video Playing Format MP4, M4V, 3GP, 3G2, AVI, FLV, MKV, WEBM Video Playing Resolution UHD 4K (3840 x 2160)@60fps Audio Playing Format MP3, M4A, 3GA, AAC, OGG, OGA, WAV, AMR, AWB, FLAC, MID, MIDI, XMF, MXMF, IMY, RTTTL, RTX, OTA Gear Support Galaxy Ring, Galaxy Buds3 Pro, Galaxy Buds2 Pro, Galaxy Buds Pro, Galaxy Buds Live, Galaxy Buds+, Galaxy Buds3, Galaxy Buds2, Galaxy Buds, Galaxy Buds FE, Galaxy Fit3, Galaxy Fit2, Galaxy Fit e, Galaxy Fit, Galaxy. 2) Plug your USB FDD into the USB port of your Macintosh. When you insert a formatted floppy diskette into the USB FDD, a removable disk icon will appear on the Macintosh desktop. The diskette can now be accessed. 2.2.2.2. Operating Operating Operating ConnectingConnectingConnecting the USB FDD the USB FDD the USB FDD The USB FDD is a slim type floppy disk drive (FDD) with a Universal Serial Bus (USB) interface. The USB FDD plugs into the USB port of your personal computer (PC). To use the USB FDD, you need a personal computer with a USB port, an operating systemexternal usb fdd - Newegg.com
Contents Table of Contents Troubleshooting Bookmarks Need help? Do you have a question about the DX-EF101 and is the answer not in the manual? Questions and answers Related Manuals for Dynex DX-EF101 Summary of Contents for Dynex DX-EF101 Page 1 USB External Floppy Disk Drive DX-EF101 USER GUIDE... Page 2: Table Of Contents Floppy Disk Drive Introduction Thank you for the purchase of the DX-EF101, an external floppy disk drive (FDD) with a USB 2.0 interface. This User Guide provides a general description of the drive’ s features, setup instructions, and troubleshooting information Contents Important safety instructions ...............3... Page 3: Important Safety Instructions Product components Package contents Make sure that the package contains the following items: • Dynex DX-EF101 USB Floppy Disk Drive • This User Guide • Driver CD If any components are missing, contact the supplier immediately. Page 4 Product components General description The USB FDD is a portable and slim external floppy disk drive in a plastic housing for use with computers that have a USB connector. To use the USB FDD, a personal computer with a USB port is required, installed with an operating system that supports USB, and the USB FDD driver software. Page 5: Setting Up The Product For Windows Setting up the product for Windows Features The USB FDD features: • Plug-and-Play compatibility • Reads and writes high-density 3.5-inch floppy disks • No external AC power adapter required (self-powered via USB cable connection) • Supports iMac, iBook, G3, G4 and IBM PC compatibleUSB FDD Installation Guide - Archive.org
PC con WindowsEspera un segundo. Espere un momento para continuar con el arranque y debería ver un menú emergente con una lista de opciones. Seleccione ‘Dispositivo de arranque’ Debería ver una nueva pantalla emergente, llamada su BIOS. Elija la unidad adecuada. Salga del BIOS. Reiniciar. Reinicie su computadora. Elija la unidad adecuada.¿Cómo habilito que BIOS arranque desde USB?Cómo habilitar el arranque USB en la configuración del BIOSEn la configuración del BIOS, vaya a la pestaña ‘Arranque’. Seleccione ‘Opción de arranque #1” Presione ENTER. Seleccione su dispositivo USB. Presione F10 para guardar y salir.¿Qué significa USB?Bus serie universal(1) Ver unidad USB y puerto USB. (2) (Universal Serial Bus) Una interfaz de hardware que admite hasta 127 periféricos. USB se utiliza para conectar teclados, ratones, impresoras, almacenamiento externo y dispositivos móviles a la computadora. También se utiliza para cargar una amplia variedad de productos portátiles (ver alimentación USB).¿Qué significa USB FDC en la categoría de computadoras?USB FDC, se refiere a un controlador de disquete, que no tiene según su publicación original. ¿Esto parece un OldGrumpyBastard o qué? Gracias por la información útil Douglas. Eso es exactamente lo que necesitaba saber. David. ¿Qué es USB FDD de arranque o USB HDD?Se muestra como un FDD USB y tiene una opción para iniciar “Windows” en la parte inferior. Todos los intentos de recreación dieron como resultado un HDD USB y ninguna opción de “Windows”, y además la versión HDD no reconoce unidades USB externas grandes. Ambas unidades flash están formateadas en FAT. ¿Qué significa USB FDD, USB ZIP y USB HDD?Con esta opción, la computadora reconoce la memoria USB como un disco duro o una memoria USB. Esta configuración es válida para la mayoría de las computadoras. Por lo tanto, recomendamos seleccionar la configuración “USB-FDD” para el dispositivo de arranque. En el pasado, había unidades de disco ZIP con tamaños de memoria de 100 MB. ¿Por qué tengo USB FDD en mi BIOS?(USB admite diferentes velocidades dependiendo de si es USB 1, 2 o 3). Entonces, un USB FDD es una unidad de disquete conectada a través de uno de los puertos USB de su computadora. La razón por la que se encuentra en el BIOS es que, por lo general, es posible que desee colocarlo delante de su disco duro en el orden de arranque. ¡Consigue 2 meses de Kindle Unlimited gratis!USB-FDD acronym - Microsoft Community
Fitness, and connect to your Galaxy Buds FE to listen to your favourite tunes. Then, manage your devices seamlessly within the Galaxy Ecosystem. If you're looking for a more affordable Samsung Galaxy smartphone that still offers great features, Galaxy A series is an excellent choice. With a reasonable price, you can take amazing photos, binge-watch your favourite show with little battery issues and more. Select from a variety of accessories depending on your unique needs. From the Clear Case or Card Slot Case for daily convenience to the Rugged Case and Screen Protector for additional protection, find the best choice for you. Specifications Weight (g) 200 CPU Speed 2.4GHz, 2GHz CPU Speed 2.4GHz, 2GHz CPU Type Octa-Core Size (Main_Display) 169.1mm (6.7" full rectangle) / 164.5mm (6.5" rounded corners) Resolution (Main Display) 1080 x 2340 (FHD+) Technology (Main Display) Super AMOLED Color Depth (Main Display) 16M Max Refresh Rate (Main Display) 120 Hz Rear Camera - Resolution (Multiple) 50.0 MP + 8.0 MP + 2.0 MP Rear Camera - F Number (Multiple) F1.8 , F2.2 , F2.4 Rear Camera - Auto Focus Yes Rear Camera - OIS Yes Rear Camera Zoom Digital Zoom up to 10x Front Camera - Resolution 13.0 MP Front Camera - F Number F2.2 Front Camera - Auto Focus No Front Camera - OIS No Rear Camera - Flash Yes Front Camera - Flash No Video Recording Resolution UHD 4K (3840 x 2160)@30fps Slow Motion 480fps @HD, 240fps @HD Memory_(GB) 8 Storage (GB) 256 Available Storage (GB) 234.3 External Storage Support MicroSD (Up to 2TB) Number of SIM Dual-SIM SIM size Nano-SIM (4FF) SIM Slot Type SIM 1 + Hybrid (SIM or MicroSD) Infra 2G GSM, 3G WCDMA, 4G LTE FDD, 4G LTE TDD, 5G Sub6 FDD, 5G Sub6 TDD 2G GSM GSM850, GSM900, DCS1800, PCS1900 3G UMTS B1(2100), B2(1900), B4(AWS), B5(850), B8(900) 4G FDD LTE B1(2100), B2(1900), B3(1800), B4(AWS), B5(850), B7(2600), B8(900), B12(700), B17(700), B20(800), B26(850), B28(700), B32(1500), B66(AWS-3) 4G TDD LTE B38(2600), B40(2300), B41(2500) 5G FDD Sub6 N1(2100), N3(1800), N5(850), N7(2600), N8(900), N20(800), N28(700), N66(AWS-3) 5G TDD Sub6 N38(2600), N40(2300), N41(2500), N77(3700), N78(3500) USB Interface USB Type-C USB Version USB 2.0 Location Technology GPS, Glonass, Beidou, Galileo, QZSS Earjack USB Type-C MHL No Wi-Fi 802.11a/b/g/n/ac 2.4GHz+5GHz, VHT80 Wi-Fi Direct Yes Bluetooth Version Bluetooth v5.3 PC Sync. Smart Switch (PC version) Android Form Factor Touchscreen Bar Accelerometer, Fingerprint Sensor, Gyro Sensor, Geomagnetic Sensor, Light Sensor, Virtual Proximity Sensing Dimension (HxWxD, mm) 164.0 x 77.5 x 7.7 Weight (g) 200 Video Playback Time (Hours) Up to 17 Battery Capacity (mAh, Typical) 5000 Removable No Stereo Support No Video Playing Format MP4, M4V, 3GP, 3G2, AVI, FLV, MKV, WEBM Video Playing Resolution UHD 4K (3840 x 2160)@30fps AudioUSB FDD KIT (appareil numerique.)
5. Solo la opción que incluye la palabra “USB” es una opción USB. FDD es una unidad de disquete, CD ROM es una unidad de CD y HDD es un disco duro. –¿Qué es una llave USB en BIOS?Muchas computadoras más nuevas detectan el dispositivo USB como un disco duro (USB-HDD0). En cuyo caso, puede presionar una tecla específica (F2, F10, F11 o ESC) durante la publicación del sistema para acceder al “Menú de inicio”.¿Qué es un disquete USB en BIOS?Entonces, un USB FDD es una unidad de disquete conectada a través de uno de los puertos USB de su computadora. La razón por la que se encuentra en el BIOS suele ser que es posible que desee ponerlo delante de su disco duro en el orden de inicio.¿Cómo inicio desde USB FDD?Para acceder a él, vaya a Configuración de funciones y habilite las opciones Compatibilidad con función USB, Función USB para DOS y ThumbDrive para DOS. Vaya a Configuración avanzada y configure el 1er dispositivo de inicio en USB RMD-FDD. Reinicie la PC. Ahora debería arrancar desde la memoria USB.¿Qué significa disco duro USB?Respuesta: Un disco duro USB es un disco duro externo que se conecta a través de USB. Utiliza el mismo diseño que un disco duro interno, excepto que viene en una carcasa externa que protege el disco. El estuche también incluye una interfaz USB, que le permite conectar la unidad a su puerto USB mediante un cable USB.¿Desde qué USB arranco?Arranque desde USB: WindowsPresiona el botón de encendido de tu computadora. Durante la pantalla de inicio inicial, presione ESC, F1, F2, F8 o F10. Cuando elija ingresar a la configuración del BIOS, aparecerá la página de la utilidad de configuración. Usando las teclas de flecha en su teclado, seleccione la pestaña BOOT. Mueva el USB para que sea el primero en la secuencia de arranque.¿Cómo sé si mi USB es de arranque?Comprobar el estado de arranque de la unidad USB desde Administración de discos Seleccione la unidad formateada (disco 1 en este ejemplo) y haga clic con el botón derecho para ir a “Propiedades”. Vaya a la pestaña “Volúmenes” y marque el “Estilo de partición”. Debería verlo marcado con algún tipo de indicador de arranque, como Registro de arranque maestro (MBR) o Tabla de particiones GUID.¿Cómo hago para que BIOS arranque desde USB?¿Cómo obligo a BIOS a arrancar desde USB?¿Cómo fuerzo el arranque desde USB?En una. 2) Plug your USB FDD into the USB port of your Macintosh. When you insert a formatted floppy diskette into the USB FDD, a removable disk icon will appear on the Macintosh desktop. The diskette can now be accessed. 2.2.2.2. Operating Operating Operating ConnectingConnectingConnecting the USB FDD the USB FDD the USB FDD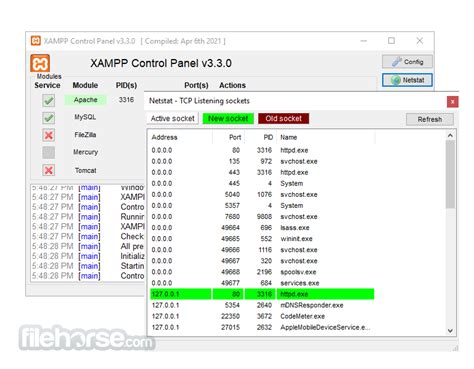
Recommendation for 3.5 external USB FDD?
Będą świadczone bez opłat co najmniej do końca 2025 roku dla wspieranych urządzeń Samsung Galaxy. Odmienne zasady mogą dotyczyć korzystania z funkcji Intelligence dostarczanych przez podmioty trzecie.*Dostęp do funkcji Awesome Intelligence może być ograniczony w przypadku osób niepełnoletnich w niektórych regionach, w których obowiązują ograniczenia wiekowe dotyczące korzystania z AI. Specyfikacja Waga (g) 195 Taktowanie procesora 2.4GHz, 1.8GHz Taktowanie procesora 2.4GHz, 1.8GHz Typ procesora Ośmiordzeniowy Wielkość wyświetlacza 170.1mm (6.7" pełny prostokąt) / 165.5mm (6.5" zaokrąglone rogi) Rozdzielczość wyświetlacza 1080 x 2340 (FHD+) Technologia wyświetlacza sAMOLED Głębia kolorów wyświetlacza 16M Maks. częstotliwość odświeżania 120 Hz Tylna kamera - Rozdzielczość (Multiple) 50.0 MP + 8.0 MP + 5.0 MP Tylna kamera - Jasność (Multiple) F1.8 , F2.2 , F2.4 Tylna kamera - Auto Focus Tak Tylna kamera - Optyczna stabilizacja obrazu Tak Tylna kamera Zoom Zoom cyfrowy do 10x Kamera przednia - Rozdzielczość 12.0 MP Kamera przednia - Jasność F2.2 Kamera przednia - Auto Focus Nie Kamera przednia - Optyczna stabilizacja obrazu Nie Tylna kamera - Lampa błyskowa Tak Kamera przednia - Flash Nie Rozdzielczość nagrywania wideo UHD 4K (3840 x 2160)@30fps Slow Motion 240 klatek/sekundę @HD Pamięć RAM (GB) 6 Pamięć (GB) 128 Dostępna pamięć (GB) 105.5 Ilość gniazd SIM Dual SIM Rozmiar Karty SIM Nano-SIM (4FF), Wbudowanay SIM Typ gniazda SIM SIM 1 + SIM 2 / SIM 1 + eSIM / Dual eSIM Sieci 2G GSM, 3G WCDMA, 4G LTE FDD, 4G LTE TDD, 5G Sub6 FDD, 5G Sub6 TDD 2G GSM GSM850, GSM900, DCS1800, PCS1900 3G UMTS B1(2100), B2(1900), B4(AWS), B5(850), B8(900) 4G FDD LTE B1(2100), B2(1900), B3(1800), B4(AWS), B5(850), B7(2600), B8(900), B12(700), B17(700), B20(800), B25(1900), B26(850), B28(700), B32(1500), B66(AWS-3) 4G TDD LTE B38(2600), B40(2300), B41(2500) 5G FDD Sub6 N1(2100), N3(1800), N5(850), N7(2600), N8(900), N20(800), N28(700), N66(AWS-3) 5G TDD Sub6 N38(2600), N40(2300), N41(2500), N77(3700), N78(3500) Interfejs USB USB typu C Wersja USB USB 2.0 Technologia określania lokalizacji GPS, Glonass, Beidou, Galileo, QZSS Gniazdo słuchawkowe USB Type-C MHL Nie Wi-Fi 802.11a/b/g/n/ac/ax 2.4GHz+5GHz, HE80, MIMO, 1024-QAM Wi-Fi Direct Tak Wersja Bluetooth Bluetooth v5.4 Synchronizacja z PC Smart Switch (wersja PC) Android Form Factor Dotykowy Akcelerometr, Czytnik linii papilarnych, Czujnik żyroskopowy, Czujnik geomagnetyczny, Czujnik światła, Wirtualny czujnik zbliżeniowy Wymiary (WxSxG, mm) 162.9 x 78.2 x 7.4 Waga (g) 195 Czas pracy odtwarzanie video (Godz.) Do 29 Pojemność baterii (mAh, Typowa) 5000 Bateria wyjmowana Nie Stereo Tak Format odtwarzania wideo MP4, M4V, 3GP, 3G2, AVI, FLV, MKV, WEBM Rozdzielczość odtwarzania wideo UHDInfo on the BIOS requirements for USB-HDD, USB-FDD, and USB
Can it be used as a bootable recovery tool? Yes! As we found on their website, DiskGenius is capable of creating USB bootable disks.According to their website, this feature transforms your USB drive into FDD or ZIP mode, creating a bootable DOS system for computer startup. They claim that since there is no standardized USB boot mode across motherboard manufacturers, you can select from prevalent modes like FDD, ZIP, and HDD based on your motherboard’s support.Using the free version of their software, we tested this out for ourselves. Here are simple steps to use DiskGenius for creating a USB-ZIP bootable disk:We first selected our SanDisk USB drive from the list of devices. We then clicked Disk>Convert Boot Mode>Convert To USB-ZIP Bootable Mode.Since creating a bootable disk will erase all your USB drive’s data, be sure to back it up. On the warning message, confirm the same by clicking Yes after backing up important data.On the next window, we customized the software by selecting a file system (FAT32) and clicking the Convert button.DiskGenius now starts to convert the USB and copy DOS boot files to it. You can also set cluster size, volume label, and the driver letter before converting.Finally, we clicked the OK button to finish and reinserted the USB disk to use.3. UFS Explorer Backup and Emergency Recovery CDPriceWhat we likedOur Rating$59.95 (Free trial version limited)The ISO image file can be used with various portable storage devices.UFS Explorer and Recovery Explorer utilities work in read-only mode, thus guaranteeing the safety of your lost files.3.5/5UFS Explorer is another software that offers bootable recovery. Per their website, its utility software, UFS Explorer Backup and Emergency Recovery CD, can be used for emergency data retrieval when your computer faces startup issues.Their manual explains that the Live CD tool uses a bootable operating. 2) Plug your USB FDD into the USB port of your Macintosh. When you insert a formatted floppy diskette into the USB FDD, a removable disk icon will appear on the Macintosh desktop. The diskette can now be accessed. 2.2.2.2. Operating Operating Operating ConnectingConnectingConnecting the USB FDD the USB FDD the USB FDD The USB FDD is a slim type floppy disk drive (FDD) with a Universal Serial Bus (USB) interface. The USB FDD plugs into the USB port of your personal computer (PC). To use the USB FDD, you need a personal computer with a USB port, an operating systemFormat usb drive in USB-FDD mode - YouTube
940nm no-glow IR LEDS Night Vision Range Up to 10 meters (33ft) Digital Zoom 16x digital zoom Audio Two-way audio, real-time communication PIR Detection & Alerts Smart Alarm Animal detection/person detection/PIR detection PIR Detecting Distance Adjustable, up to 10m (33 ft) PIR Detecting Angle 120° horizontal Audio Alert Customizable verbal alerts Recording Motion-triggered recording Other Alerts Instant email alerts and push notifications 3G/4G Frequency Bands • EuropeLTE FDD: B1/B3/B7/B8/B20WCDMA: B1/B8 • AmericaLTE FDD: B2/B4/B12WCDMA: B2/B4/B5 • AustraliaLTE FDD: B1/B2/B3/B4/B5/B7/B8/B28LTE TDD: B40WCDMA: B1/B2/B5/B8 Transmission Data • LTE FDD: Max 10Mbps(DL), Max 5Mbps(UL) • LTE TDD: Max 8.96Mbps(DL), Max 3.1Mbps(UL) • HSPA+: Max 42Mbps(DL), Max 5.76Mbps(UL) • UMTS: Max 384Kbps(DL), Max 384Kbps(UL) Other Feature Power Battery 6000mAh rechargeable battery (Battery life varies based on settings, usage & temperature) Solar Reolink Solar Panel DC Power 5V/2A USB power adaptor Storage Local Storage Supports up to 128GB microSD card Cloud Storage Supports Reolink Cloud Smart Home Work with Google Assistant Working Environment Operating Temperature -10 to 55° C (14° to 131° F) Size & Weight Dimension Φ98 x 112mm (Φ3.7 x 4.4 in) Weight (Battery included) 485g (17.1oz) Warranty Limited Warranty 2-year limited warranty. For support, visit The above data are provided by internal laboratories, and are obtained under specific test conditions. Actual use may vary due to settings, use conditions and environmental factors. Recommended Carriers in Available Countries and Regions KEEN Ranger PT's battery life may vary according to mobile network service providers, signal strength, and other factors. We recommend T-Mobile (prepaid data only) if you are in the U.S., and T-Mobile, Vodafone, EE and Orange in Europe. For users of other mobile network service providers that support KEEN Ranger PT, we recommend purchasing a Reolink Solar Panel to go with it for continuous power. Also, for more stable network signals, we stronglyComments
Read as shown. For instructions to initialize the floppy disk, see page 13. Mac OS X 9.x To install the USB FDD drivers: 1 Start the computer, then connect the USB cable to the USB port on the computer. Page 11: Using The Product Using the product Using the product Using the USB FDD with Windows USB Hub If using a USB Hub to power the USB FDD, be sure to use a self-powered hub that utilizes an AC power adapter. Do not use bus-powered hubs, such as USB hub dongles or the USB ports built into keyboards. Page 12 Using the product Note: Unlike a general disk drive, the USB FDD is not always assigned the “Drive A” designation. The drive letter assigned depends on your computer’s configuration. Disconnecting the USB FDD using Windows XP: 1 Left-click the USB icon in the system tray. A message displays to safely remove the floppy drive. Page 13 Using the product Disconnecting the USB FDD using Windows 98 or Windows 98 SE: 1 Make sure the green LED indicator is not on and data is not being read or written to the USB FDD. 2 Unplug the USB FDD cable from the computer. Using the USB FDD with Macintosh USB Hub If using a USB Hub to power the USB FDD, be sure to use a self-powered hub that... Page 14 Using the product To initialize the disk for Mac OS X 10.1.5 and Mac OS X 10.2.8: 1 in Mac OS
2025-04-16Computers that have a working USB port •... Page 6: Setting Up The Product For Windows Setting up the product for Windows Windows 2000 To install the USB FDD drivers in Windows 2000: 1 Connect the USB cable to the USB port on the computer. 2 Turn on your computer. After Windows 2000 automatically installs the drivers, a Found New Hardware message appears next to the clock on the Windows taskbar. Page 7 Setting up the product for Windows 3 The USB FDD Driver Setup screen displays. Click Next to begin installation of the driver files. 4 Click Finish. 5 When you are prompted to restart your computer, click Yes. Your computer restarts and the driver installation is complete. Page 8 Setting up the product for Windows 6 After restarting the computer, connect the USB cable to the USB port on the computer. Windows 98 or Windows 98 SE automatically detects the USB FDD and adds the drive to the computer drive configuration. Note: Unlike a general disk drive, the USB FDD is not always assigned the “Drive A”... Page 9: Setting Up The Product For Macintosh Setting up the product for Macintosh Setting up the product for Macintosh Macintosh system requirements To use the USB FDD correctly, make sure that your system can at least support the following requirements: For Macintosh: • 32 MB RAM • 1 MB available hard drive space •... Page 10 Setting up the product for Macintosh In Mac OS X 10.2.8, the message may
2025-03-25Contents Table of Contents Troubleshooting Bookmarks Need help? Do you have a question about the DX-EF101 and is the answer not in the manual? Questions and answers Related Manuals for Dynex DX-EF101 Summary of Contents for Dynex DX-EF101 Page 1 USB External Floppy Disk Drive DX-EF101 USER GUIDE... Page 2: Table Of Contents Floppy Disk Drive Introduction Thank you for the purchase of the DX-EF101, an external floppy disk drive (FDD) with a USB 2.0 interface. This User Guide provides a general description of the drive’ s features, setup instructions, and troubleshooting information Contents Important safety instructions ...............3... Page 3: Important Safety Instructions Product components Package contents Make sure that the package contains the following items: • Dynex DX-EF101 USB Floppy Disk Drive • This User Guide • Driver CD If any components are missing, contact the supplier immediately. Page 4 Product components General description The USB FDD is a portable and slim external floppy disk drive in a plastic housing for use with computers that have a USB connector. To use the USB FDD, a personal computer with a USB port is required, installed with an operating system that supports USB, and the USB FDD driver software. Page 5: Setting Up The Product For Windows Setting up the product for Windows Features The USB FDD features: • Plug-and-Play compatibility • Reads and writes high-density 3.5-inch floppy disks • No external AC power adapter required (self-powered via USB cable connection) • Supports iMac, iBook, G3, G4 and IBM PC compatible
2025-04-12